Continous Deployment from a GitHub repository to a VPS using Jenkins
Due to the increasing amount of additions I was making to my website, I was hoping to make the process of publishing new changes simpler. My initial setup involved publishing changes to a Git repository from my laptop, connecting to the server through SSH, manually checking out any changes and then rebuilding the website. This felt like a good excuse to foray into the world of continuous deployment (CD) while making my life easier.
After some research, I was drawn to Jenkins because it was an open-source option, although in hindsight Octopus or something similar would have been just as good (and potentially easier).
Jenkins Setup and Nginx Configuration
Setting up Jenkins was straightforward. Since I’m running an Ubuntu VPS, I followed the instructions in the Jenkins documentation to add the repository to apt, install jenkins and get it running through systemctl.
In order to access Jenkins remotely, the easiest option would be to set the firewall to allow direct connections to Jenkins using sudo ufw allow from <PERSONAL IP> to any port 8080 (8080 being the default Jenkins port), alternatively using sudo ufw allow 8080 to allow inbound connections to port 8080 from any IP.
Jenkins only runs as a HTTP server, which is obviously not ideal when accessing the server remotely (and setting up GitHub credentials), so I looked into other options to secure the connection through SSL. My website is running on an Nginx server with SSL certs generated through LetsEncrypt, so setting up a reverse proxy to allow https://tobymelin.com/jenkins to point to the Jenkins server on localhost:8080 turned out to be the best solution.
I based my Nginx config on this, specifically the section “Running Jenkins from a folder with TLS encryption”. After restarting my Nginx server everything was up and running!
GitHub Configuration
There are plenty of different ways of setting up the GitHub ↔ Jenkins communication depending on requirements and personal preference. The two methods I have used are;
- Creating a GitHub app to allow Jenkins to access private repositories, set build statuses, etc.
- Setting up a webhook on the GitHub side (a one-way connections which only works for public repositories. See this post for details).
Requirements (Jenkins Plugins):
- GitHub Plugin
- GitHub Branch Source Plugin
- Pipeline: Multibranch Plugin
There are many different ways of configuring the GitHub ↔ Jenkins integration (too many). The simplest one would be to store the GitHub username and password as credentials in Jenkins, but it does not work with 2FA and I would like to avoid providing full account access for security reasons. In the end I opted for setting up a GitHub App for Jenkins.
Go to GitHub Account Settings → Developer Settings → GitHub Apps (https://github.com/settings/apps) and add a new app.
Give the GitHub App a name of your choice (eg. Personal Jenkins in my case), activate the Webhook and set the URL to the Jenkins webhook URL (eg. https://tobymelin.com/jenkins/github-webhook/).
Note: The Payload URL is always the same. Jenkins automatically determines which pipeline(s) to start running based on the payload sent by GitHub.
Under Repository permissions, the following are required by the Branch Source plugin:
- Commit statuses: Read & Write
- Contents: Read-only
- Metadata: Read-only
- Pull Requests: Read-only
Under Subscribe to events, the plugin documentation suggests subscribing to all options, however I opted to only subscribe to Meta and Push without having any issues.
After adding the GitHub App, I installed it to my website_portfolio repository (which is the only repository I want to use with Jenkins for now) and generated a new private key.
In order to import the private key into Jenkins, it must be downloaded from GitHub and converted using the following command;
openssl pkcs8 -topk8 -inform PEM -outform PEM -in key-in-your-downloads-folder.pem -out converted-github-app.pem -nocrypt
Jenkins Configuration
1. Setting up GitHub credentials
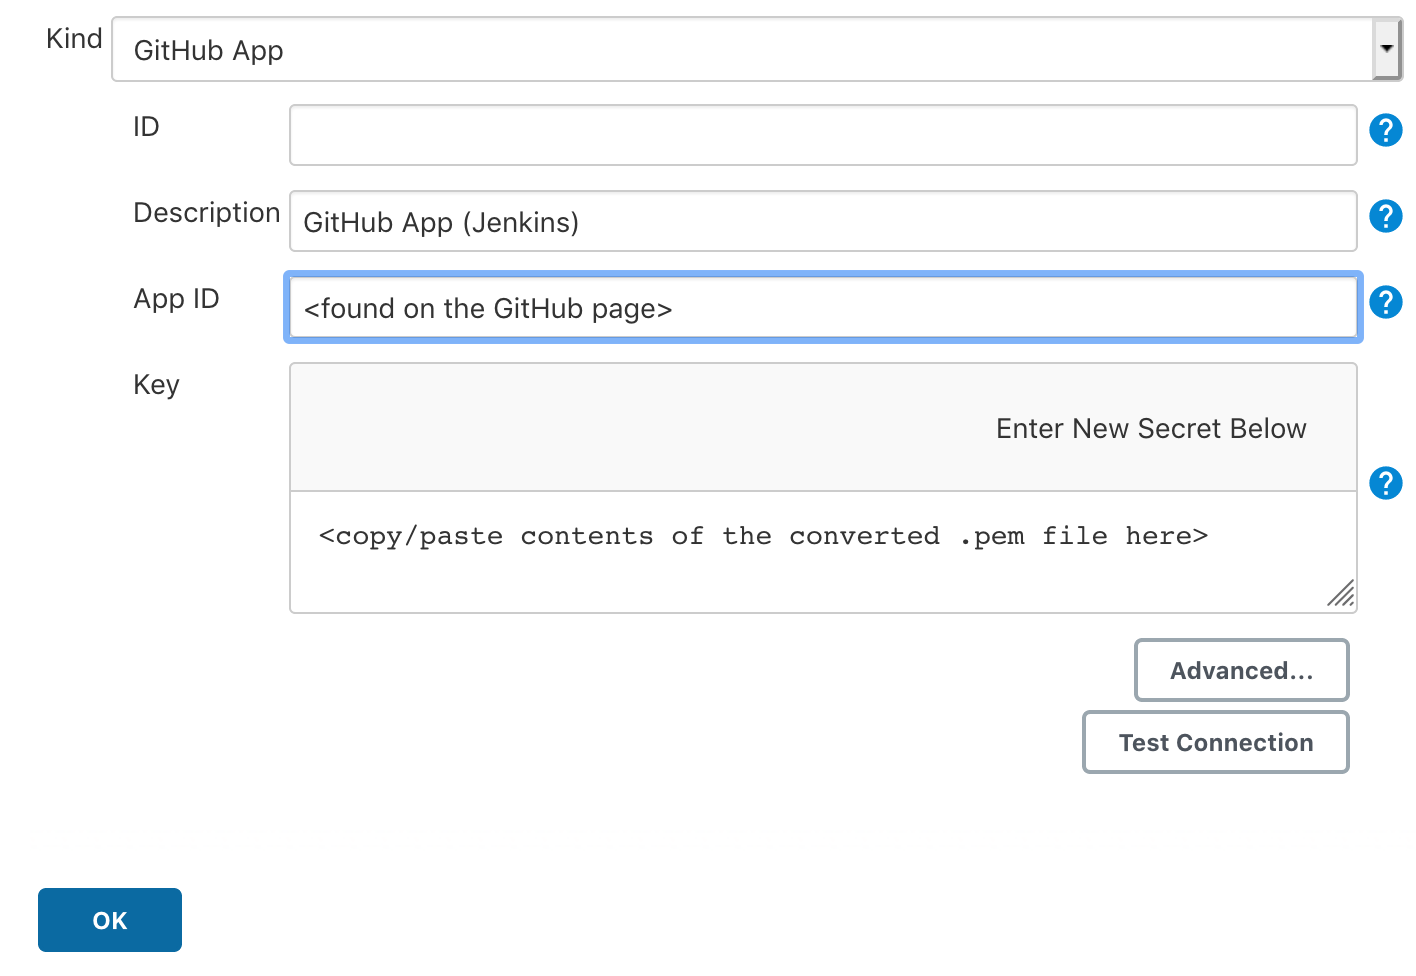
Setting up the credentials is simple enough. Ensure that the correct plugins are installed in Jenkins, then go to Manage Jenkins → Manage Credentials from the main dashboard and add a new credential under the (global) domain with the information shown below. Clicking ‘Test Connection’ should provide a success message.
2. Creating the Jenkins workflow
From the main Jenkins dashboard, select New Item, enter the GitHub repository name as the pipeline name and select Multibranch Pipeline from the list.
Under Branch Sources, select your GitHub App credentials from the dropdown list, paste your GitHub repository URL into the text box and click the ‘Validate’ button to ensure everything works correctly. I ended up having some issues here which turned out to be the result of not installing the GitHub App on my account after creating it (duh).
I kept everything else as default with one exception; because I only want to build and deploy the master branch, I added a new behaviour for ‘Filter by name (with wildcards)’ and changed the ‘Include’ field to master.
Common Issues:
- GitHub commit status is not updated properly after Jenkins pipeline finishes; Depending on the Jenkins project type, the plugins may not be able to parse enough information to set the commit status properly
- Multibranch Pipelines work with the setup described here, as should GitHub Organization projects.
- A regular Pipeline does not work without additional setup. I experimented with the GitHub Notify plugin, but decided there were easier ways of achieving what I wanted.
- Freestyle projects work as they should, however a new Post-build action needs to be added to the project to set the commit status. The downside to this type is that all build actions are configured in the UI instead of as a Jenkinsfile which can be versioned.
3. Adding the Jenkinsfile to the repository
In order to get this system fully set up and working, Jenkins needs to know what to do once the webhook is called from GitHub. This is done through a Jenkinsfile (documentation). Because of my setup, this is as simple as can be;
pipeline {
    agent any
    stages {
        stage('Build') {
            steps {
                sh 'make'
            }
        }
        stage('Publish') {
            steps {
                sh 'make publish'
            }
        }
    }
}
This consists of two steps; Build and Publish, both of which just call commands in the Makefile;
build: clean
	hugo --cacheDir=/tmp/hugo_cache_${USER}

clean:
	-rm -rf public/*

publish:
	rsync -av --del public/ /var/www/website/
After committing and pushing the Jenkinsfile to the repository, Jenkins should start building the project as soon as its webhook is called from GitHub (usually within a minute in my use case) and successfully set the commit status on GitHub once everything is complete.
4. BONUS: Commit statuses for each step in the Jenkins pipeline
By default Jenkins only sets the commit status once for the entire pipeline, meaning there is no way of telling which step is failing. Installing and configuring these two plugins will make Jenkins send a commit status for each step in the pipeline instead;
- Job and Stage monitoring plugin (GitHub Autostatus)
- Configured in the main Jenkins settings panel
- Disable GitHub Multibranch Status
- Disables the status updates that are automatically sent by the Multibranch Pipeline plugin
- Configured per project